


Hi fellow sewers.
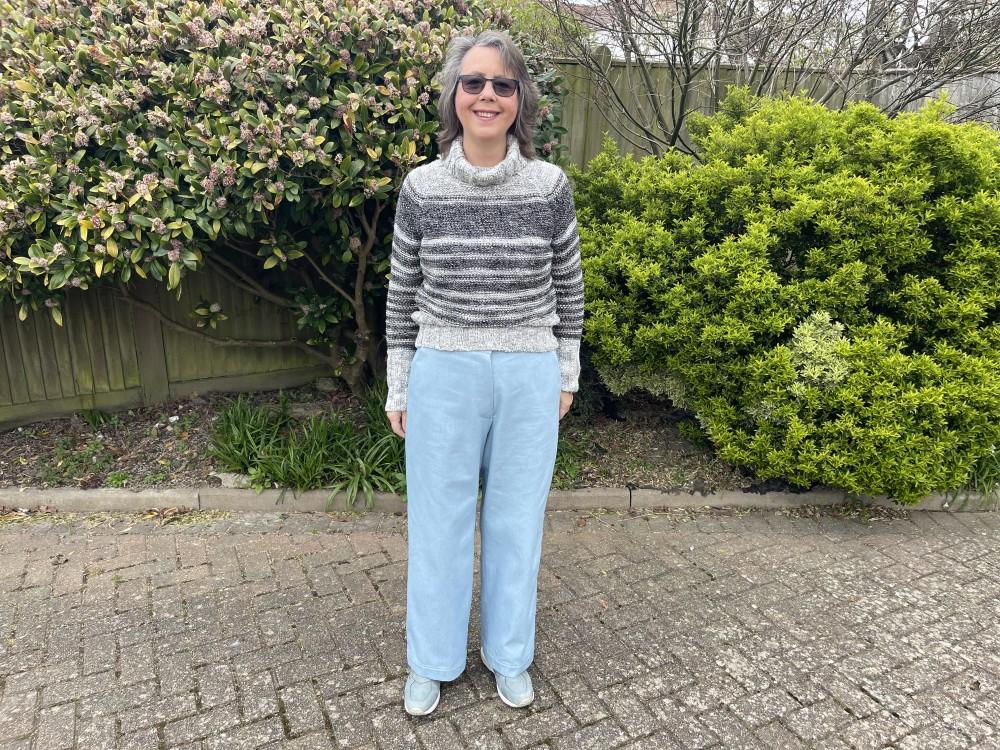
My latest make is one I absolutely love. I was gifted Minerva 2.5 metres of Minerva core range 290gsm soft washed denim fabric in an ice blue colour.
When the fabric arrived I overlocked the raw edges and washed it straight away. I really loved the look and feel of it. The perfect weight for transitioning into spring/summer.
The Sussex Seamstress has just released the Ferrying trouser pattern. She kindly gifted me the pattern prior to release. To give it for me to try. As of writing this blog post this pattern is available direct from Sussex Seamstress website. And not from Minerva yet. I decided to make these trousers with the denim. First I wanted to make a toile. To check for fit. I bought loads of calico ages ago. Just for this purpose.
I’m copying this from Ferring details:
The Ferring trousers are the ultimate reliable staple; a classic, straight-leg trousers that offers a tailored fit without sacrificing comfort. The silhouette is timeless: a flattering straight leg that skims the hips and thighs, offering a look that is neither too tight nor too baggy. They are designed to sit comfortably at the natural waist, creating a smooth line that elongates the leg. The front has a clean, flat finish with a classic zip fly closure. Deep,angled side pockets provide functionality without adding bulk. Shaping is achieved through waist darts in the back, ensuring a contoured fit that eliminates gaping at the waistband.
Skill level:
Confident beginner
U.K. Sizing
Size 8 - 30
Waist 67 cm - 120 cm or approx 26” - 47”
Hips 93 cm - 140 cm or approx 36” - 55”
Depending on your size you will need about 2 m - 2.5 m at 140 cm wide. Depending if the fabric is directional.
Looking at the sizing chart my measurements put me at a 16 waist and 14 hips. So I traced the pattern. Grading from a size 16 at the waist, to a 14 at the hips. I also added 5 cm to the length of the trousers. I measured these trousers against my easy fitting trouser block for size and length.
Even though I was making a toile I decided to make the trousers up, including the fly zip. To get an accurate idea of sizing. I’m glad I made a toile as I did find the hips a bit tight. The dreaded hungry bum! I think if I made the trousers with stretch fabric I would be fine. So I am keeping this first pattern for that purpose.
I marked the area that was a bit tight on the calico. And made adjustments on the pattern pieces. Giving myself more ease around the hips. I did add about 1 cm to the waist area also.
I followed the Sussex Seamstress free YouTube tutorial. She always has a great free tutorial for each of her patterns. Her written instructions are great too. As are her accompanying diagrams. I didn’t need much to watch much of the tutotial, it was on more for background noise. As I was fine with most of the instructions. I did overlock all the seams. As denim does have a tendency to fray. I used a poly cotton for the pocket bag. To reduce bulk. There are options for what fabric you can use. Even having a pocket side facing. If you want to use a lighter weight fabric. And using the main fabric for this facing piece.
The only part of this pattern I know I would struggle with would be adding the fly zip. I have done a few now. With varying levels of success. I was determined to get this right. I did take my time and watched the tutorial several times for this part. And I’m pleased to say I got it right. It’s sitting in the right place and looks good. Phew! I do find having a tutorial helps for areas like the fly zip. It certainly encouraged me to have a try at this type of pattern.
At this stage I tried the trousers on. My adjustments around the hip area were spot on. I took the cm out of the side seams at the waistline, grading into the pocket area. As I felt the trousers were just a bit too big. I then needed to take this cm out of the waistband pieces too. What I did was to clip one waistband section to the trousers, just to check I got it right.
Waistband on and I chose a hook and bar closure. I attached them. Then changed my mind. As they just didn’t work for me. I then decided to add a jeans button. As I have a green machine and loads of jeans buttons. My zip is gold. So I added a gold button. Although I’d rather used silver. One thing I do, is fail at getting the button in the correct position. Resulting in a bit of the zip showing I took my time and keep trying the trousers on and pinning where I wanted to add the button. I then tested the button hole on scrap denim. Then added the buttonhole. Holding my breath, until it was made. I’m pretty pleased with the result. Like everything I always wish the button was a few mm’s over. But really, I’m being hard on myself. It sits ok. I’m not a professional after all!
I’m really pleased with these trousers. I love the look of them. They are a great fit. And flattering. Even though I’ve used denim, these are not jeans. They are a gorgeous pair of straight leg trousers. Something I don’t have in my wardrobe. I love the fitted waistband. I was a bit concerned about using denim without stretch. Particularly around the waistband. However, they are really comfy. I love the feel of the denim. It’s the perfect transitional weight fabric. And I love having a wider leg trousers too.
I think these are going to be one of my most worn garments. I love how they look. I can see myself making more of this pattern. In many different weight fabrics. So I have a pair for different seasons.
I’d highly recommend the Ferring trouser pattern. It’s just fab. One of Jayne’s best patterns yet.
The denim is:
* 290 gsm, which is 8.55 oz.
* It’s classed as medium/heavy. To me it feels more like a medium weight.
* It has no stretch.
* Is 100% cotton.
* Is 145 cm/57.1”.
* Is available in 6 different colours. They are black, dark blue, indigo blue, light blue, medium blue and my ice blue. I’d definitely make something else with this denim. It’s a real joy to wear.
Since making the Ferring trousers and taking the images, I have worn these trousers an awful lot. They are so comfortable.