


8 years ago
Modifications:
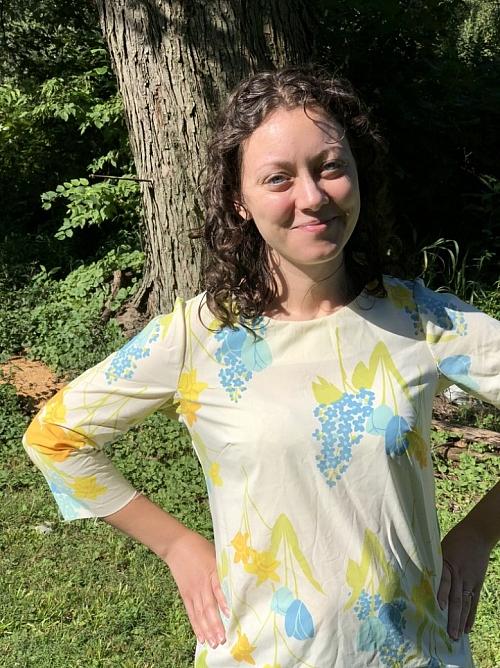
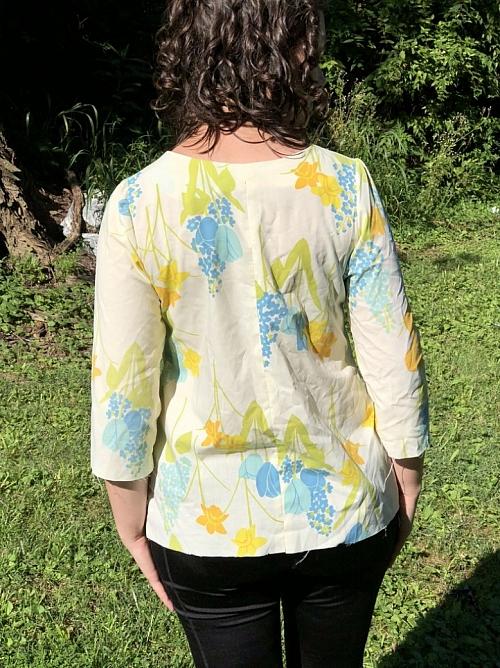
The arms were too tight at the biceps. I also saw that there were drag lines at the bust. For the next muslin I want to go up to size 10 for the bust and arms.
The hips area was slightly small for comfort. I had an interesting discovery with this project. I’ve sewn for many years and have enjoyed making garments for myself (but this is the first straight cut, woven dress that I’ve made). All other woven garments that I’ve sewn have had an a-line or gathered waistline. I thought the widest part around my waist was around my backside but I found that there is a slightly wider dimension measuring slightly lower around my hips. This was a fun discovery to sew a garment shape that I haven’t worked with yet on my own body. I need to go up to a size 14 at the hips.
Muslin #2: I decided to try a top for this muslin (Version 3), to save use less fabric/sheets.
Modifications:
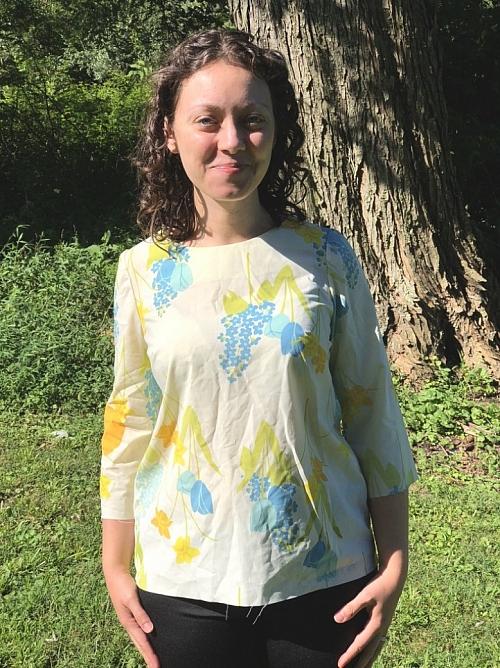
The bust looks much better at a size 10. I need to do a full bicep adjustment for the sleeves in the final garment (to gain slightly more room in the biceps). I used this helpful tutorial to widen the bicep by 1.5”; http://sewaholic.net/widen-sleeve-full-bicep-adjustment/
This modification is quite helpful to keep the fit the same at the shoulder and wrist but add more ease around the biceps. If you’ve never tried this modification (and you think you might need to) I highly recommend you give it a try!
I found that the under arms had slightly less movement, for my comfort level. You can visually note the smaller arm movement on me in the pictures of muslin #1. To increase the arm movement I found this helpful tutorial; https://www.youtube.com/watch?v=GqFiVww0p84
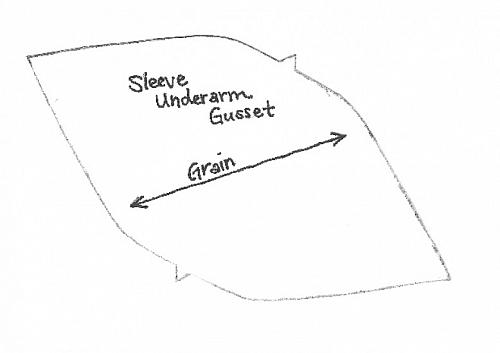
This technique is to add a gusset to the underarm, without making any other modifications to the pattern. I drafted a gusset pattern (image below) if you would like to experiment with it for your dresses as well.
Something I tried as well was to trace this new gusset pattern onto a piece of watercolor paper. The paper is quite stiff and will be handy to keep and use for future pattern modifications. I tested this gusset pattern piece on muslin #2 in both underarms.
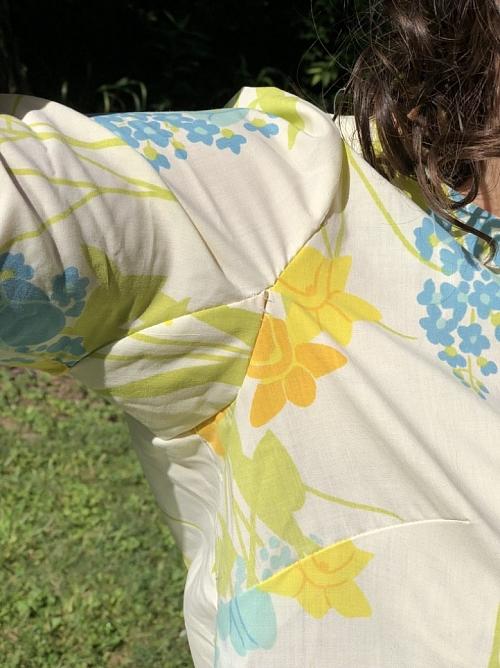
I was really happy with the result of adding the gusset! I followed the suggestions in the tutorial and also sewed a ¼” seam allowance (6mm) around the armhole and underarm gusset (to give more room around the armhole). You don’t notice the gusset when the arm is laying flat, in the natural position but you can see this added material under the arm, for reference. I basted the gusset in for a quick test for fit.
I did not include the keyhole back for this muslin. I have read a few pattern reviews on this pattern and learned that the keyhole feature in the back is for the look and not necessary for the function of getting the top/dress on and off of your head. Although I think it was fun to remove this feature in this muslin, I’m going to add it back in for the final dress (as I like the classier look of the keyhole).
Final Dress:
Materials:
Silk head pins
Fabric clips
Black Poly Thread
Yellow Poly Thread (for taylor’s tacks)
Hand sewing needle
Lining fabric, I used a Rayon Challis
1 Button
Elastic cord
80/12 universal sewing machine needle
Roller foot or walking foot (for a sewing machine)
Underarm gusset pattern
My final seam allowances (per my fit preferences):
Bust dart: 1/2”
Back Seam: 1/2”
Shoulders: 1/2”
Side Seams: 1/2”
Neck facing: 5/8”
Arm hole: 1/4”
Gusset: 1/4”
I used both fabric clips and silk head pins in this project. You typically don’t want to use pins when working with pleather but in some parts of the assembly, I liked the stability of using pins (and the holes weren’t noticeable with the tulle as the base layer of the fabric).
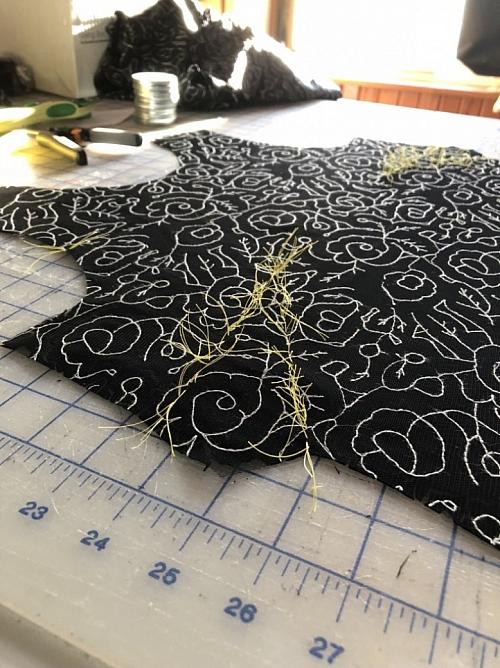
After cutting out the fabric I marked each notch and the bust darts with a needle and thread via Taylor’s tacks. I’ve not yet utilized Taylor’s tacks in a sewing project, I’ve just heard them mentioned online. They do take some time but are quite worth the effort, in the end.
Continued in my next post…
#minervamakes #minervamakers #isew #memade #memades #sewing #sewist #sewists #sewinginspo #sewinginspiration #sew #sewcialist #sewingproject #sewingprojects #sewingideas #sewingprojectideas #sewingpatterninspo #lovesewing #ilovesewing #sewsewsew #sewersgonnasew #makersgonnamake #sewaholic #sewaholics #shareyoursewing #sewinglove #handmadewardrobe #handemadeclothes #isewmyclothes #diyclothes #dressmaking #fabricinspo #seamstress #memadeeveryday #imakemyclothes #imakemyownclothes #fashion #fashioninspo #memadewardrobe #memadefashion #diyfashion #diywardrobe #fashionsewing #indiepatterns #indiesewingpatterns #sewoveritpatterns #sewoveritultimateshiftdress #ultimateshiftdress #sewingdresses #sewingwithfauxleather #fauxleathersewingprojects #soiultimateshiftdress #sewingshiftdresses
The arms were too tight at the biceps. I also saw that there were drag lines at the bust. For the next muslin I want to go up to size 10 for the bust and arms.
The hips area was slightly small for comfort. I had an interesting discovery with this project. I’ve sewn for many years and have enjoyed making garments for myself (but this is the first straight cut, woven dress that I’ve made). All other woven garments that I’ve sewn have had an a-line or gathered waistline. I thought the widest part around my waist was around my backside but I found that there is a slightly wider dimension measuring slightly lower around my hips. This was a fun discovery to sew a garment shape that I haven’t worked with yet on my own body. I need to go up to a size 14 at the hips.
Muslin #2: I decided to try a top for this muslin (Version 3), to save use less fabric/sheets.
Modifications:
The bust looks much better at a size 10. I need to do a full bicep adjustment for the sleeves in the final garment (to gain slightly more room in the biceps). I used this helpful tutorial to widen the bicep by 1.5”; http://sewaholic.net/widen-sleeve-full-bicep-adjustment/
This modification is quite helpful to keep the fit the same at the shoulder and wrist but add more ease around the biceps. If you’ve never tried this modification (and you think you might need to) I highly recommend you give it a try!
I found that the under arms had slightly less movement, for my comfort level. You can visually note the smaller arm movement on me in the pictures of muslin #1. To increase the arm movement I found this helpful tutorial; https://www.youtube.com/watch?v=GqFiVww0p84
This technique is to add a gusset to the underarm, without making any other modifications to the pattern. I drafted a gusset pattern (image below) if you would like to experiment with it for your dresses as well.
Something I tried as well was to trace this new gusset pattern onto a piece of watercolor paper. The paper is quite stiff and will be handy to keep and use for future pattern modifications. I tested this gusset pattern piece on muslin #2 in both underarms.
I was really happy with the result of adding the gusset! I followed the suggestions in the tutorial and also sewed a ¼” seam allowance (6mm) around the armhole and underarm gusset (to give more room around the armhole). You don’t notice the gusset when the arm is laying flat, in the natural position but you can see this added material under the arm, for reference. I basted the gusset in for a quick test for fit.
I did not include the keyhole back for this muslin. I have read a few pattern reviews on this pattern and learned that the keyhole feature in the back is for the look and not necessary for the function of getting the top/dress on and off of your head. Although I think it was fun to remove this feature in this muslin, I’m going to add it back in for the final dress (as I like the classier look of the keyhole).
Final Dress:
Materials:
Silk head pins
Fabric clips
Black Poly Thread
Yellow Poly Thread (for taylor’s tacks)
Hand sewing needle
Lining fabric, I used a Rayon Challis
1 Button
Elastic cord
80/12 universal sewing machine needle
Roller foot or walking foot (for a sewing machine)
Underarm gusset pattern
My final seam allowances (per my fit preferences):
Bust dart: 1/2”
Back Seam: 1/2”
Shoulders: 1/2”
Side Seams: 1/2”
Neck facing: 5/8”
Arm hole: 1/4”
Gusset: 1/4”
I used both fabric clips and silk head pins in this project. You typically don’t want to use pins when working with pleather but in some parts of the assembly, I liked the stability of using pins (and the holes weren’t noticeable with the tulle as the base layer of the fabric).
After cutting out the fabric I marked each notch and the bust darts with a needle and thread via Taylor’s tacks. I’ve not yet utilized Taylor’s tacks in a sewing project, I’ve just heard them mentioned online. They do take some time but are quite worth the effort, in the end.
Continued in my next post…
#minervamakes #minervamakers #isew #memade #memades #sewing #sewist #sewists #sewinginspo #sewinginspiration #sew #sewcialist #sewingproject #sewingprojects #sewingideas #sewingprojectideas #sewingpatterninspo #lovesewing #ilovesewing #sewsewsew #sewersgonnasew #makersgonnamake #sewaholic #sewaholics #shareyoursewing #sewinglove #handmadewardrobe #handemadeclothes #isewmyclothes #diyclothes #dressmaking #fabricinspo #seamstress #memadeeveryday #imakemyclothes #imakemyownclothes #fashion #fashioninspo #memadewardrobe #memadefashion #diyfashion #diywardrobe #fashionsewing #indiepatterns #indiesewingpatterns #sewoveritpatterns #sewoveritultimateshiftdress #ultimateshiftdress #sewingdresses #sewingwithfauxleather #fauxleathersewingprojects #soiultimateshiftdress #sewingshiftdresses
Add all tagged items to your basket